备忘,以前总是用图片素材来实现
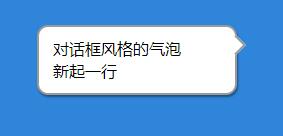
效果如图(直男审美,未优化)

完整的源码DEMO
<!DOCTYPE html>
<html>
<head lang="en">
    <meta charset="UTF-8">
    <title>CSS气泡</title>
</head>

<style>
body {background: #0086da;  }

.mid {
    position: absolute;
    z-index: 1;
    top: 50%;
    left: 50%;
    -webkit-transform: translate(-50%,-50%);
    transform: translate(-50%,-50%);
}

.bubble {
    background: #fff;
    padding: 11px 14px;
    line-height: 1.4rem;
    position: relative;
    box-shadow: 1px 2px 2px rgba(0,0,0,0.4);
    border-radius: 11px;
    border:2px solid #999;
}
.bubble::before {
    content: '';
    background: #fff;
    position: absolute;
    width: 12px; height: 12px;
    right: -8px;
    top: 11px;
    transform: rotate(45deg);
    border-top: 2px solid #999;
    border-right: 2px solid #999;

}

</style>

<body>

<div class="mid" style="width: 200px">
    <div class="bubble">
        对话框风格的气泡<br/>
        新起一行
    </div>
</div>


</body>
</html>
源码解析
HTML部分
<div class="bubble">
    对话框风格的气泡<br/>
    新起一行
</div>
CSS部分
.bubble {
    background: #fff;
    padding: 11px 14px;
    line-height: 1.4rem;
    position: relative;
    box-shadow: 1px 2px 2px rgba(0,0,0,0.4);
    border-radius: 5px;
    border:2px solid #999;
}
.bubble::before {
    content: '';
    background: #fff;
    position: absolute;
    width: 12px; height: 12px;
    right: -8px;
    top: 11px;
    transform: rotate(45deg);
    border-top: 2px solid #999;
    border-right: 2px solid #999;
}
在 .bubble置入一个同背景色的方块且旋转45度,位移 使其一半外露在泡泡边缘外形成角尖。
注意的两点
- bubble需要定义position ,否则尖角无法参考位置定位
- 计算尖角的位置要考虑上边框等因素

